We Provide Preventive Appliance Maintenance to Maximize Performance and Minimize Breakdowns across Long Beach, Anaheim, Los Angeles, and beyond!
Better performance
Prolong lifespan
Improve efficiency
Electrical & gas safety
Prevents costly repairs
Below is an overview of what is typically included in the appliance maintenance process for various household appliances:
1. Inspection
Visual Check: A thorough visual inspection of the appliance to identify any obvious signs of wear, damage, or malfunction.
Component Check: Inspecting key components such as electrical wiring, plumbing connections, heating elements, motors, and seals to ensure they are functioning as intended.
Safety Check: Ensuring all safety features, such as automatic shutoff, thermostat settings, or pressure relief valves, are working correctly.
Performance Testing: Running the appliance through a test cycle (for washers, dryers, dishwashers, etc.) to evaluate its performance and check for any irregularities like unusual noises, vibrations, or inefficient operation.
2. Cleaning
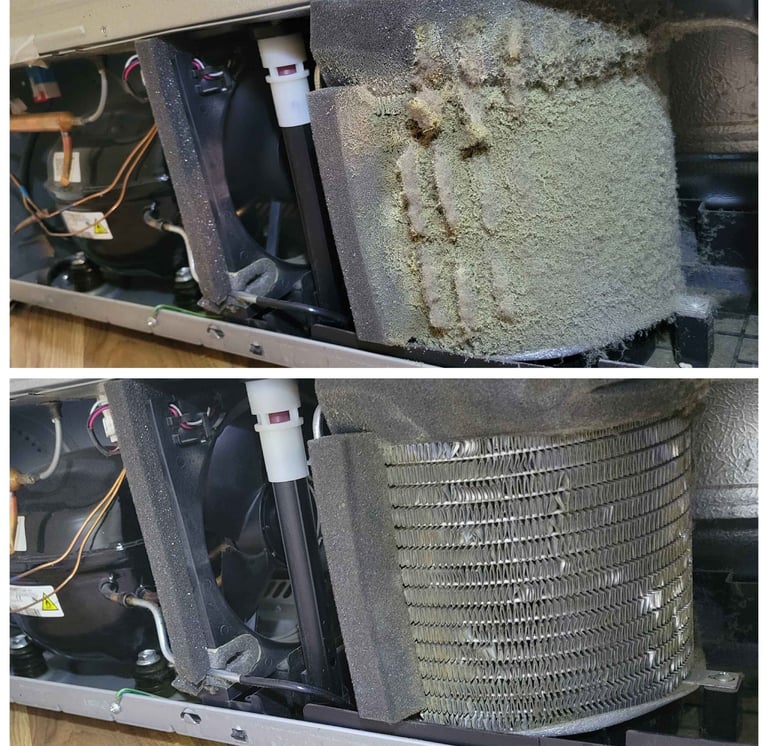
Internal and External Cleaning: Cleaning the exterior and interior of the appliance to remove dust, grease, or dirt that can cause inefficiency or wear. For example, in a refrigerator, cleaning the coils, shelves, and seals; for an oven, cleaning the interior, including racks and burners.
Airflow Cleaning (for Dryers & HVAC): Cleaning vents, filters, and fans to ensure proper airflow and prevent lint or dust buildup that could lead to overheating or poor performance.
Drain Cleaning (for Dishwashers & Washing Machines): Clearing any blockages from drain pipes or hoses to prevent clogs and ensure proper drainage.
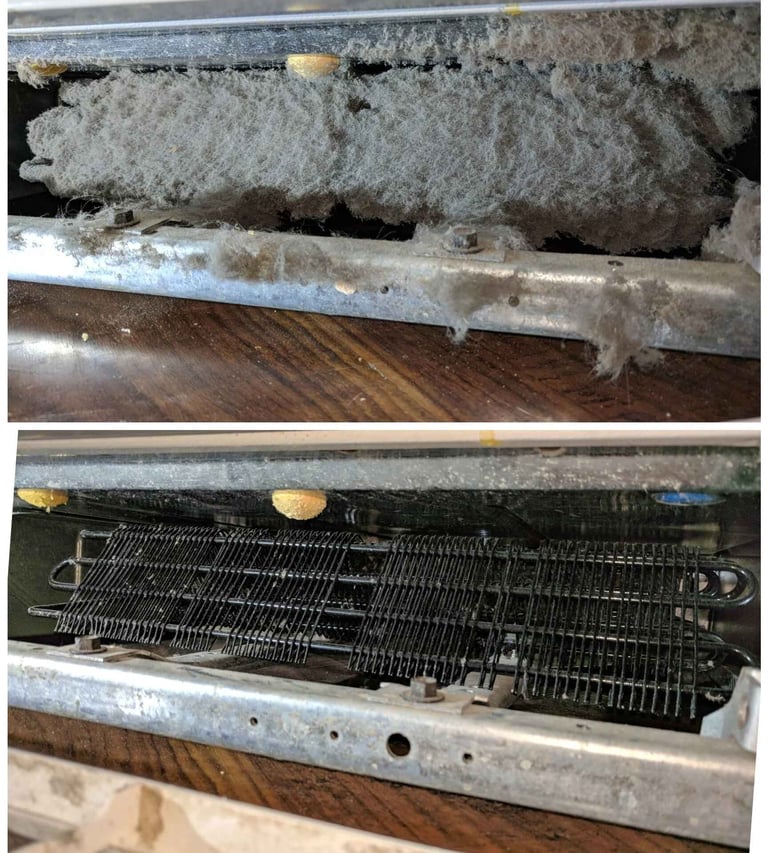

The appliance maintenance process is a comprehensive set of tasks designed to keep household appliances running efficiently, safely, and for an extended period of time. It involves inspecting, cleaning, repairing, and testing key components of the appliance.
3. Component Maintenance
Belt & Motor Checks: Inspecting belts, motors, and pulleys for wear and tear. In many appliances, these components are crucial for proper function and require regular maintenance.
Lubrication of Moving Parts: Applying lubrication to parts like door hinges, rollers, motors, and fans to minimize friction and prevent premature wear.
Gasket & Seal Checks: Inspecting and replacing worn out seals and gaskets that could cause leaks, loss of energy efficiency, or damage to the appliance.
Replacing Filters: Changing filters (in appliances like refrigerators, air purifiers, and dishwashers) to ensure they remain effective and to maintain appliance performance.
4. Electrical & Plumbing Checks
Electrical System Check: Inspecting the wiring, switches, and power supply connections for signs of damage or corrosion that could create a safety hazard.
Plumbing Connections (for Dishwashers, Washing Machines, etc.): Ensuring water supply hoses are intact, not leaking, and properly connected.
Voltage and Current Tests: Testing the electrical voltage and current to ensure the appliance is operating within safe parameters.
5. Part Replacement
Worn or Faulty Parts Replacement: Replacing any worn or malfunctioning components, such as belts, thermostats, heating elements, filters, or seals. Replacing parts as needed to restore the appliance to full functionality.
Upgrading Parts: In some cases, maintenance can involve upgrading components to improve efficiency or meet modern energy standards.
6. Preventive Maintenance & Recommendations
Preventive Tips: Providing advice on how to maintain the appliance, such as cleaning schedules, usage tips, or how to prevent wear and tear.
Future Maintenance Planning: Suggesting when the next maintenance service should be scheduled based on the current condition of the appliance.
7. Final Testing
After all maintenance tasks are completed, the appliance undergoes a final test to ensure that it’s operating at its optimal capacity.
Final Adjustments: If any issues are detected during testing, they are addressed immediately to ensure the appliance is fully functional.
Summary
By adhering to this process, appliances can function more efficiently, last longer, and reduce the risk of breakdowns or costly repairs. Regular maintenance is key to ensuring the safety and efficiency of household appliances.
Inspection: Visual and functional checks.
Cleaning: Internal and external cleaning, including vents, filters, and ducts.
Component Maintenance: Lubricating parts, checking belts, motors, seals, etc.
Electrical & Plumbing: Ensuring safe electrical connections and leak free plumbing.
Part Replacement: Replacing worn out or faulty parts like filters, belts, and seals.
Testing & Adjustments: Verifying the appliance’s functionality and making adjustments.
Preventive Maintenance: Offering tips for future maintenance and ensuring longevity.
Reliable Care For Your Appliances
What motivates our customers to choose us for home appliance repair?
Affordable prices
Licensed Certified Insured
Guaranteed satisfaction
Warranty
We firmly believe that customer satisfaction is the cornerstone of our success.
Upfront, and transparent pricing. No hidden fees. Free service call with any repair!
When you choose us, you're choosing quality, professionalism, and reliability!
On parts and labor, providing you with confidence that your appliance is repaired correctly.
We breathe new life into appliances from all major brands!
If you can't find your brand, just give us a call! Chances are we have worked on that brand many times before.



Refrigerators are essential appliances that can last for many years with the right maintenance. If you're noticing any of the following signs, it could be time for some attention to keep your fridge running efficiently:
Signs your Refrigerator needs maintenance:
Warm Fridge or Freezer: If the fridge is warm or the freezer isn't freezing properly, it might indicate issues with the thermostat, door seals, or compressor.
Excessive frost build-up: A buildup of frost in the freezer could be a sign of a faulty defrost heater, door seals, or improper airflow.
Strange Noises: While refrigerators do make some noise, loud or unusual sounds (clicking, buzzing, or grinding) can indicate problems with the motor, compressor, or fan.
Water leakage: Puddles of water inside or under the fridge can be a result of a clogged defrost drain, blocked water line, or faulty door seals.
Inconsistent temperature: If food is spoiling more quickly or staying too cold, it could be a thermostat issue, or the fridge may not be cooling efficiently.
Ice Maker not working: If your fridge has an ice maker and it stops working, the problem could be related to a frozen water line, faulty valve, or the ice maker's motor.
Excessive energy bills: A sudden increase in your energy bill may be due to a malfunctioning fridge that's working harder than necessary, possibly because of dirty coils or a problem with the compressor.
Bad odors: Unpleasant smells could be due to food spills, a dirty drip pan, or a moldy water line.
Refrigerator Maintenance
Maintenance tips for optimal efficiency:
Clean the condenser coils: Dusty or dirty condenser coils make your fridge work harder. Clean them at least twice a year using a vacuum cleaner or a coil brush.
Check door seals: Inspect the door seals for cracks or gaps. A loose or damaged seal can cause cold air to leak out, leading to inefficiency. Clean the seals with warm, soapy water and replace them if necessary.
Adjust the temperature settings: Keep your fridge at around 37°F (3°C) and your freezer at 0°F (-18°C). Temperatures outside this range can lead to food spoilage or excessive energy use.
Defrost regularly: If your fridge is a manual defrost model, make sure to defrost it regularly. Ice buildup can affect cooling efficiency.
Clear drain lines: The defrost drain can get clogged with food debris or ice. Use a small pipe cleaner or turkey baster with warm water to clear the drain.
Keep it clean inside: Clean the fridge regularly, removing old food and wiping down shelves with mild soap and water. This helps maintain good airflow and hygiene.
Level the Fridge: Ensure the fridge is level to prevent strain on the compressor and ensure the door seals properly. Check with a level tool and adjust the feet as needed.
Check for leaks: Periodically inspect the water lines (if you have an ice maker or water dispenser) for leaks or cracks. Repair or replace any damaged lines promptly.
Unclog the drip pan: Refrigerators have a drip pan beneath them to collect condensation. Empty and clean it every six months to prevent mold and bad odors.
Not over stuff: A well-stocked fridge retains cold better, but don’t overcrowd it, as air needs to circulate freely around the food for proper cooling.
By keeping your fridge clean and well-maintained, you can extend its lifespan, reduce energy consumption, and prevent major breakdowns. If you notice any persistent issues, it’s a good idea to have a professional technician inspect and repair your refrigerator.

There are several signs that your Gas Dryer requires maintenance:
1. Dryer is not heating
What it means: If your dryer isn't producing heat, it could be due to a faulty gas valve, igniter, or heating element. This is one of the most obvious signs that maintenance is required.
What to do: Check the burner or igniter and ensure the gas supply is working. It may require professional repair if there's a gas flow or electrical issue.
2. Longer than usual to dry clothes
What it means: This is often a sign of poor airflow, caused by a clogged vent, lint buildup, or a malfunctioning thermostat or heating element.
What to do: Clean the vent, lint trap, and check the ducts for blockages. If the problem persists, inspect the heating element or thermostat.
3. Damp clothes after full cycle
What it means: This could indicate that the dryer isn’t reaching the correct temperature or that there is poor airflow, preventing proper drying.
What to do: Check the gas supply, clean the vent system, and inspect the thermostat to ensure it's properly regulating heat.
4. Strange noises
What it means: Unusual noises like thumping, squeaking, or rattling can be caused by worn-out drum rollers, belt issues, or a broken blower wheel.
What to do: Inspect the drum for any obstructions, check the rollers and belt, and look for any worn-out or broken components.
5. Dryer Isn’t spinning
What it means: If the drum isn't turning, it could be due to a malfunctioning belt, motor, or other mechanical issue.
What to do: Inspect the drive belt and motor. If necessary, replace the belt or have the motor checked by a professional.
6. Excessive heat or overheating
What it means: If the dryer is overheating, it could be a result of a faulty thermostat, blocked venting, or issues with the gas valve or igniter.
What to do: Make sure the vents are clear, inspect the thermostat, and test the dryer’s cycling settings.
7. Gas smell
What it means: A gas odor can indicate a gas leak, which is a serious safety concern.
What to do: Immediately stop using the dryer, leave the area, and contact a professional technician to inspect the gas line for leaks.
8. Error codes
What it means: Some dryers display error codes to signal specific issues like sensor problems, blocked venting, or electrical malfunctions.
What to do: Refer to your dryer’s user manual for the meaning of any codes and follow recommended troubleshooting steps.
9. Dryer is shaking or vibrating
What it means: Shaking or excessive vibrations may be caused by an unbalanced load, worn-out drum support, or a problem with the dryer’s leveling.
What to do: Check the load for unevenly distributed clothes and balance the dryer. Inspect the drum supports and ensure the appliance is properly leveled.
10. Burning smell
What it means: A burning smell can be due to overheating components or lint buildup in the dryer vent.
What to do: Immediately turn off the dryer and clean the lint filter and vent system. If the smell persists, you may need to check the heating elements or consult a professional.
11. Dryer won’t start
What it means: If the dryer doesn’t turn on at all, it could be due to an issue with the start switch, timer, or door latch.
What to do: Check the door switch to ensure it's secure, and test the start button. If those are working, there could be a wiring issue.
12. Noisy when operating
What it means: Squealing or grinding noises are often caused by problems with the drum rollers, bearings, or motor.
What to do: Examine the rollers, belts, and bearings to identify any wear or damage.
Gas & Electric Dryer Maintenance
Here are some signs that an Electric Dryer requires maintenance:
1. Dryer is not heating properly
Cause: In electric dryers, the issue may be related to a faulty heating element, thermal fuse, or high-limit thermostat. Gas dryers use a burner, but electric dryers rely on heating elements that can wear out or become damaged over time.
What to check: If the dryer is running but not producing heat, it’s likely the heating element or the associated components have failed.
2. Dryer is not turning
Cause: A faulty door switch, start switch, or a broken belt could prevent the dryer from starting, even if the interior light still works.
What to check: Inspect the door switch to ensure it engages properly when the door is closed. A broken drive belt can prevent the drum from rotating but might not affect power to the light.
3. Dryer stops mid-cycle
Cause: Electric dryers have thermal fuses and circuit breakers that can trip due to overheating or electrical issues. If the dryer suddenly stops during a cycle, there may be a tripped fuse or breaker, or a problem with the cycling thermostat.
What to check: Inspect the thermal fuse and thermostat for damage. If the fuse is blown, it needs to be replaced. Similarly, check the circuit breaker to ensure it’s not tripped.
4. Longer than usual to dry clothes
Cause: A problem with the airflow could be the issue. While this can happen in both gas and electric dryers, electric dryers are particularly prone to clogged lint traps, vent hoses, or vent ducts. If airflow is restricted, the heating element may overheat and cause the dryer to work inefficiently.
What to check: Clean the lint filter, ducts, and venting system. Make sure the vent hose is not kinked or obstructed, and ensure proper air circulation.
5. Burning smell
Cause: This could indicate an issue with the heating element or wiring. Overheating elements or worn wires can cause electrical components to short, leading to the smell of burnt plastic or metal.
What to check: Unplug the dryer and inspect the heating element for visible damage or wear. If you notice any exposed wires or burnt areas, call a technician for repairs.
6. Buzzing or humming noises
Cause: Electric dryers contain an electric motor that could be causing buzzing or humming sounds if it’s failing or dirty. A malfunctioning motor can also cause the dryer to stop working entirely.
What to check: Ensure the drum is properly aligned and free of debris. Check the motor for signs of wear and lubrication issues.
7. Excessive moisture
Cause: This might point to a faulty thermostat, which regulates the temperature during drying. If the thermostat is malfunctioning, it can result in inadequate heating and lead to clothes staying damp even after a full cycle.
What to check: If your clothes are still wet or damp after a drying cycle, check the thermostat or cycling switch for accuracy. Also, inspect the moisture sensor, which helps the dryer adjust cycle times based on moisture levels.
8. Error codes
Cause: Many modern electric dryers have digital displays with error codes that help diagnose specific problems related to electrical components like sensors, the heating element, or thermostats.
What to check: Refer to your dryer's user manual for the meaning of any error codes. These codes can often point to specific issues with the heating system or internal wiring.
9. Dryer blows cold air instead of hot air
Cause: This could be a sign of a broken heating element or thermal fuse. If the dryer is not producing heat at all, the air will remain cold throughout the drying process.
What to check: Inspect the heating element for continuity with a multimeter. If it’s broken or short-circuited, it will need replacing. Also check for any tripped thermal fuses.
10. Outlet or plug is hot to the touch
Cause: Overheating of the electrical outlet can indicate an electrical fault in the dryer’s power cord or plug, which could be hazardous.
What to check: If the plug or outlet feels warm or hot, immediately unplug the dryer and have a qualified electrician inspect the power cord, plug, and the electrical connections.
Maintenance Tips:
Clean the Lint Trap: Empty the lint trap after each load to ensure proper airflow.
Check Gas Lines and Vents: Periodically inspect gas lines for leaks and ensure vents are clear and functioning well.
Level the Dryer: Ensure your dryer is level to prevent excessive vibration or wear.
If you're experiencing any of these issues, it's a good idea to schedule a professional appliance repair service to get it running again. You can do that by filling out our online form and sending us a message, or by giving us a call.
Aspeco Appliance Repair has been proudly serving Los Angeles and Orange counties. That includes the following areas:
Service Area
Anaheim
Buena Park
Costa Mesa
Fullerton
Garden Grove
Huntington Beach
Irvine
Laguna Niguel
Mission Viejo
Newport Beach
Orange
Santa Ana
Tustin
Westminster
Yorba Linda
Bellflower
Carson
Cerritos
Compton
Downey
Gardena
Hawthorne
Inglewood
Lakewood
Long Beach
Los Angeles
Norwalk
Paramount
South Gate
Torrance
@aspecoappliancerepair
Services
Aspeco
Mon-Sun
8:00am - 7:00pm
Contacts
Business hours
